Creating your first VM
Prerequisites
- You’ve installed the Anka Virtualization package.
- The machine you wish to use for running Anka VMs is using Apple processors and not Intel.
- The machine you wish to use has Monterey (>= 12.0) installed.
1. Create your first VM
SIP is ENABLED by default inside of Anka 3 VMs post-creation. It can be disabled after creation by launching in recovery mode.
It’s important to understand that the anka CLI, VM creation, modification, etc, is all done from your current user. You cannot move VMs between users easily without the Anka Build Cloud Registry.Creating a VM in Anka 3 differs from the Intel version: Anka 3 requires that you manually set up macOS inside of the VM. See step #3 below.
Rosetta can be installed and used inside of the VM.
Anka VM Templates support the following macOS versions:
13.x(macos Ventura) (if using Monterey host, creating a 13.x VM requires 14.x Xcode-beta is installed to avoid Apple bug)12.x(macOS Monterey)
Apple’s .app installer files are currently not supported.
Anka 3.0 VMs only work with macOS versions >= 12.0.
Using the Anka UI
- Click on Create new VM.
- LEAVE INSTALLER BLANK and click on Options to set any non-default values you want.
Leaving the installer blank will automatically target the latest macOS version, pulling the IPSW file from the official Apple CDN (
updates.cdn-apple.com). You can use your own IPSW file with the Anka CLI instead.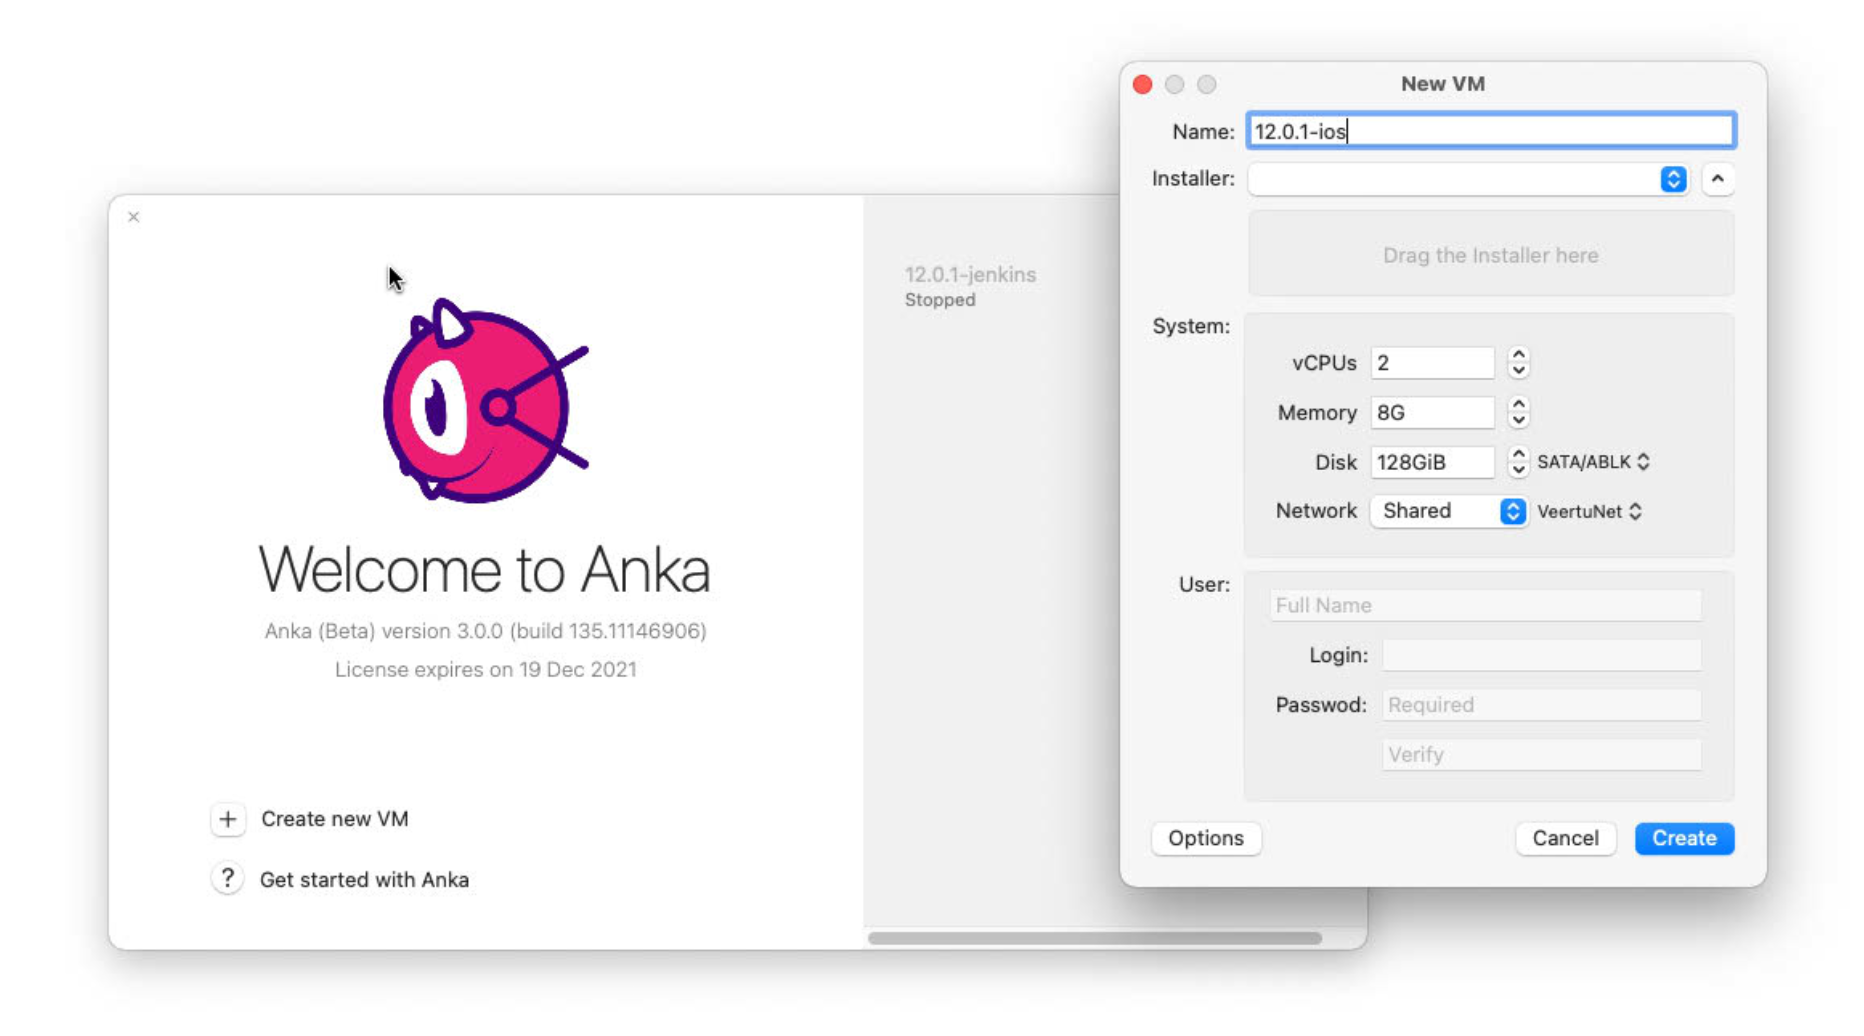
- Be patient while it’s creating.
Once the VM is created, you will see it on the sidebar – Hooray!
Suspending VMs is currently not available.

Using the Anka CLI
> anka create --help
usage: create [options] name

   Creates a VM Template

arguments:
  name                     VM name

options:
  -m,--ram-size <val>      Specify the VM RAM size (supported suffixes: T|G|M|K)
  -c,--cpu-count <val>     Specify the number of vCPU cores for the VM (3 or more is recommended)
  -d,--disk-size <val>     Specify the VM disk size (supported suffixes: T|G|M|K)
  -a,--app <val>           Path or URL (or 'latest' to dowload the latest version) to the macOS restore image
❯ anka create -a latest 12.2.0-arm
Installing UniversalMac_12.1_21C52_Restore.ipsw...
######################################################################## 100.0%
00c44c30-174a-4266-8833-89d6975754bd
We recommend naming your initial VM after the version of macOS.
Remember that VM templates are created under a specific user and will not be available to other users.
By default, 2vCPUs is not enough and will cause instability inside of the VM. VCPUs are determined by taking the physical performance cores and multiplying by 2. This means you can set the CPU on creation for an M1 mini with 4 physical perf cores to
anka create --cpu-count 4, and run two VMs per host (8vCPUs available).
IPSW vs .app installers
While we recommend you use anka create -a latest to automatically download the latest macOS version to install into the VM, you can bring your own IPSW file which is very similar to how Anka 2 works with .app installers (which are not supported in Anka 3).
There are multiple ways to obtain IPSW files. Apple provides these through their updates.cdn-apple.com site. You can usually find the official links to the version you want with your preferred search engine. Alternatively, you can use ipsw.me to identify and retrieve your desired IPSW file.
3. Start the VM and finish the macOS install
For our addons to install and enable autologin properly, you need to create the VM user as username:ankaand password:admin. If you decide to use your own username and password, you will need to manually enable autologin for the user.
With the UI
We do not currently support mounting addons from the UI. Please use the CLI for now.
With the CLI
> anka start --help
usage: start [options] vmid

   Start or resume a VM

arguments:
  vmid                     VM to start

options:
  -f,--force               Start VM with minimum checks
  -q,--quiet               Minimize output
  -v,--view                Open VM in an Anka window
  -u,--update-addons       Start in (auto)update mode
- You’ll need to start the VM with
anka start -uvto launch the viewer.
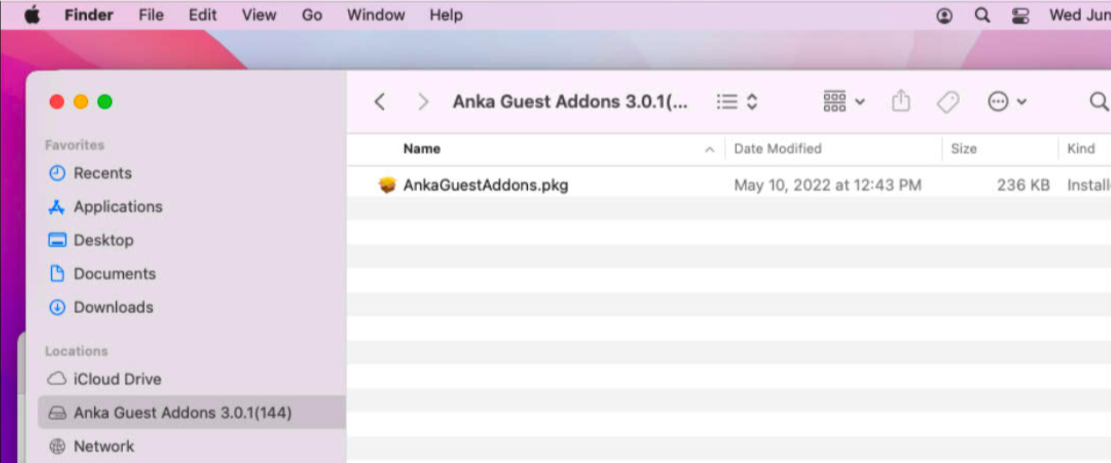
anka view does not currently work post-start unless you started it with -v.- Once inside the Anka Viewer/VM, finish the macOS installation and be sure to install the addons package through the disk we mounted with
-u.
- Reboot the VM.
Listing available VMs in the CLI
❯ anka list
+----------------------+--------------------------------------+---------------------+---------+
| name                 | uuid                                 | creation_date       | status  |
+----------------------+--------------------------------------+---------------------+---------+
| 12.2.0-arm (vanilla) | a6f24306-2af7-45ed-9d70-3a3c1ee7f03a | Jan 6 12:34:52 2022 | stopped |
+----------------------+--------------------------------------+---------------------+---------+
| test_vm1             | 565e47ce-a9f9-4ac8-81bc-645d48473de1 | Jan 6 12:34:52 2022 | stopped |
+----------------------+--------------------------------------+---------------------+---------+

❯ anka --machine-readable list | jq
{
  "status": "OK",
  "body": [
    {
      "name": "12.2.0-arm",
      "uuid": "a6f24306-2af7-45ed-9d70-3a3c1ee7f03a",
      "creation_date": "2022-01-06T12:34:52Z",
      "version": "vanilla",
      "status": "stopped"
    },
    {
      "name": "test_vm1",
      "uuid": "565e47ce-a9f9-4ac8-81bc-645d48473de1",
      "creation_date": "2022-01-06T12:34:52Z",
      "status": "stopped"
    }
  ]
}

❯ anka --machine-readable list --field name --field version | jq
{
  "status": "OK",
  "body": [
    {
      "name": "12.2.0-arm",
      "version": "vanilla"
    },
    {
      "name": "test_vm1"
    }
  ]
}
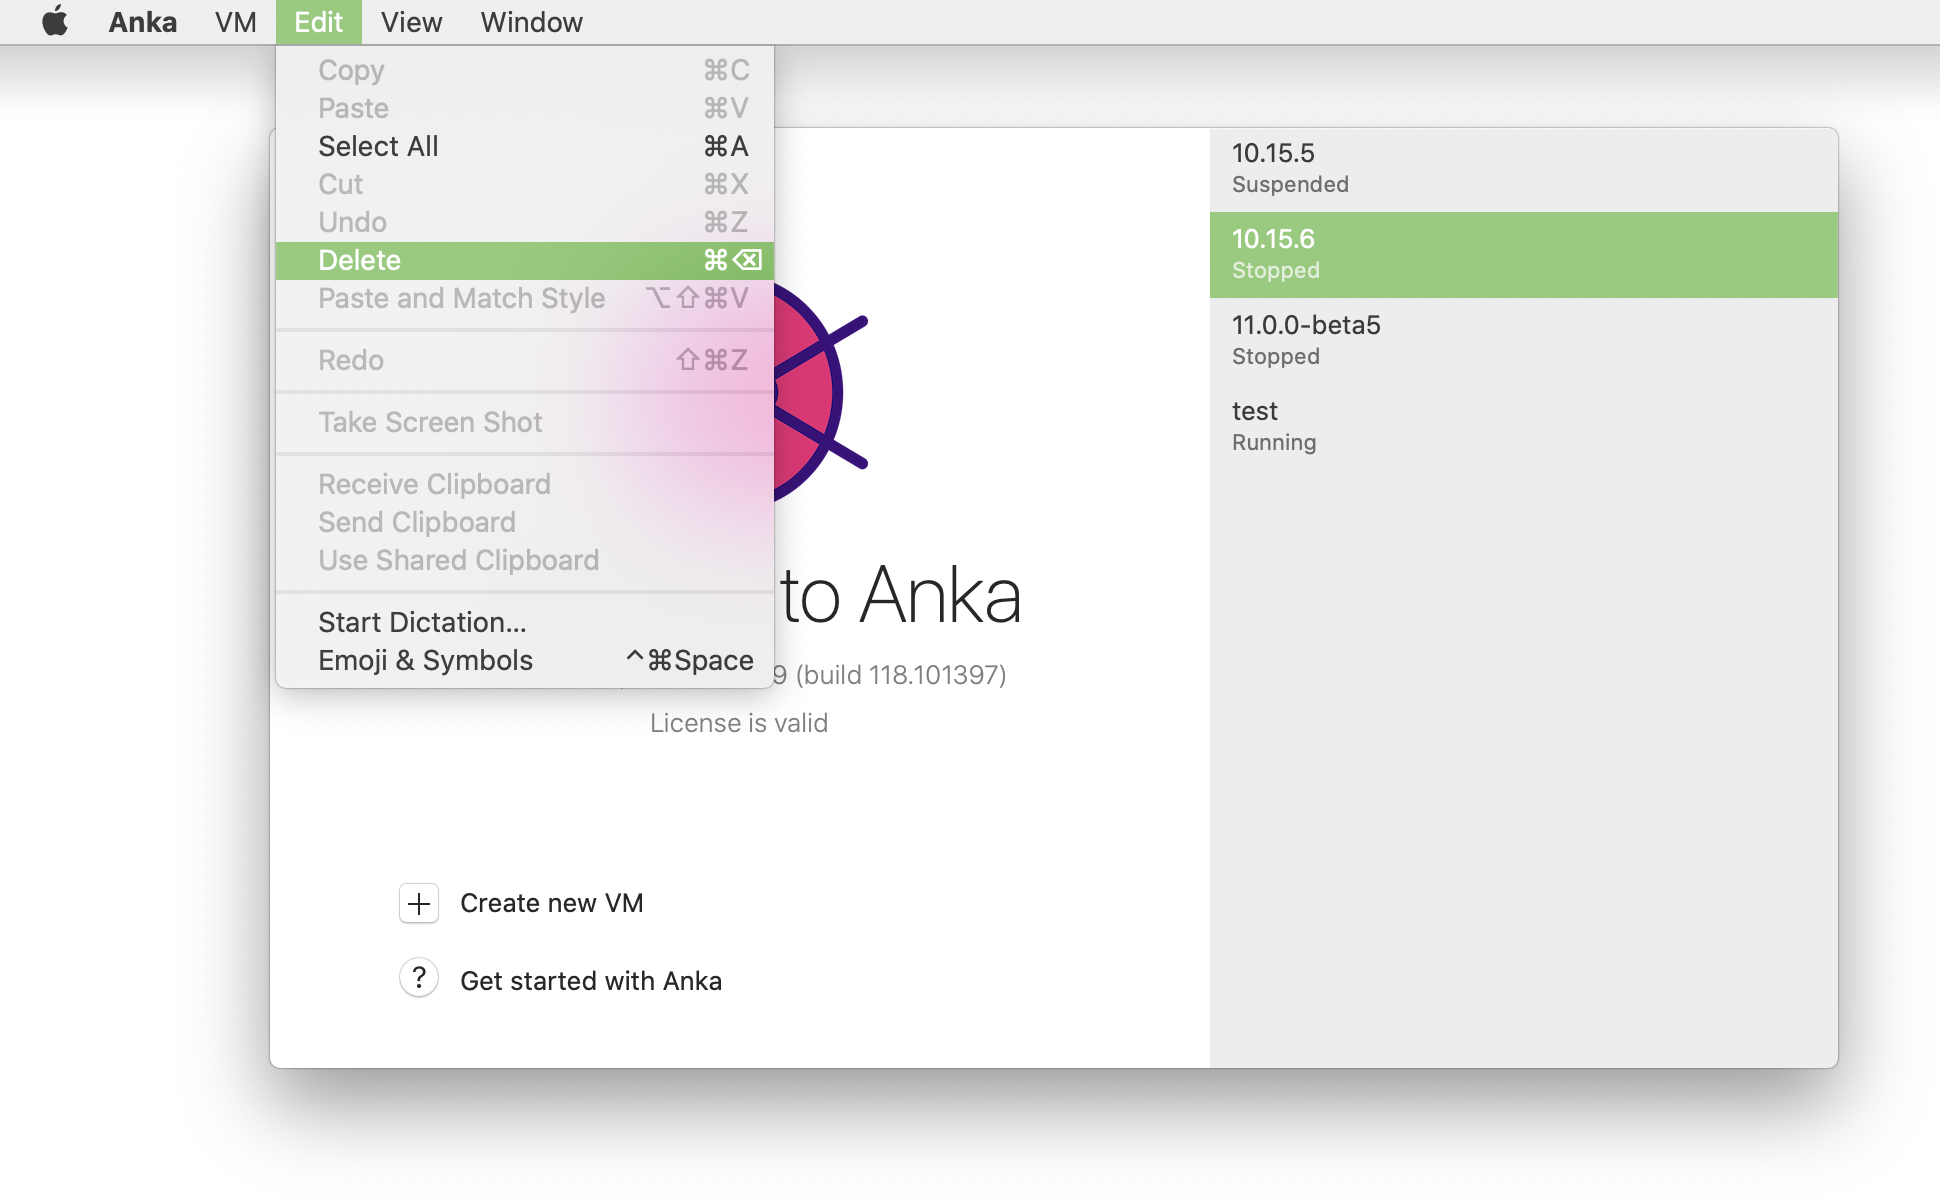
Deleting a VM
Using the Anka UI
Using the Anka CLI
❯ anka delete test
are you sure you want to delete vm 77f33f4a-75c3-47aa-b3f6-b99e7cdac001 test [y/N]:
VM Clones
You can easily create VM clones from a source VM and its current state using anka clone:
> anka clone --help
usage: clone [options] vmid [name...]

   Clone a VM

arguments:
  vmid                     VM to clone
  name                     New VM name(s)

options:
  -c,--copy                Create an independent copy
  -t,--tag <val>           Clone particular VM tag (should be available locally)
❯ anka list
+--------+--------------------------------------+----------------------+---------+
| name   | uuid                                 | creation_date        | status  |
+--------+--------------------------------------+----------------------+---------+
| 12.0.1 | e65a072f-0d4f-450b-964d-2be8d0d32c13 | Nov 19 08:02:33 2021 | stopped |
+--------+--------------------------------------+----------------------+---------+


❯ anka clone 12.0.1 12.0.1-xcode13
6070ee59-6c16-4c93-ba7a-122b66b1472a

❯ anka list
+----------------+--------------------------------------+----------------------+---------+
| name           | uuid                                 | creation_date        | status  |
+----------------+--------------------------------------+----------------------+---------+
| 12.0.1         | e65a072f-0d4f-450b-964d-2be8d0d32c13 | Nov 19 08:02:33 2021 | stopped |
+----------------+--------------------------------------+----------------------+---------+
| 12.0.1-xcode13 | 6070ee59-6c16-4c93-ba7a-122b66b1472a | Nov 19 08:02:33 2021 | stopped |
+----------------+--------------------------------------+----------------------+---------+
Disk Optimization
Customers coming from Anka 2 will know that when you clone an untagged VM, it will share the underlying VM image files between the two. However, this is not the case for Anka 3. As of right now, sharing of the underlying VM image files between a clone and its source requires first creating a tag for the source before you clone. You can do this with anka push --local, or just a regular anka push if you’ve got a running Anka Build Cloud Registry.
Don’t worry, clones will not have access to change the original source VM.
> anka push --help
usage: push [options] vmid

   Push a VM to the registry

arguments:
  vmid                     VM to push

options:
  -t,--tag <val>           Set the tag name to push
  -v,--remote-vm <val>     Registry template to push the tag onto
  -d,--description <val>   Set textual description of the tag
  -f,--force               Forcefully push, regardless of a tag already existing
  -l,--local               Commit the template without pushing it to the Registry
  -s,--shallow             Include all the changes of an older tags
  -q,--quiet               Do not show progress
  -r,--registry <val>      Sets an alternate registry
❯ anka list
+--------+--------------------------------------+----------------------+---------+
| name   | uuid                                 | creation_date        | status  |
+--------+--------------------------------------+----------------------+---------+
| 12.0.1 | 002b73b6-dc99-4d6b-8f68-6067a3a66d73 | Nov 19 08:02:33 2021 | stopped |
+--------+--------------------------------------+----------------------+---------+

❯ anka push --local --tag vanilla 12.0.1

❯ anka list
+------------------+--------------------------------------+----------------------+---------+
| name             | uuid                                 | creation_date        | status  |
+------------------+--------------------------------------+----------------------+---------+
| 12.0.1 (vanilla) | 002b73b6-dc99-4d6b-8f68-6067a3a66d73 | Nov 19 08:02:33 2021 | stopped |
+------------------+--------------------------------------+----------------------+---------+
The above example shows the tag “vanilla” does not exist locally until we execute the anka push --local.
Cloned VMs will use a trivial amount of disk space until you start them. Once started, an empty image is created and connected on top of existing images and any changes to or in macOS are then added to it.
To switch between tags locally, you can use the
anka pull --local --tag {targetTagname} {VMName}command:> anka pull --help usage: pull [options] vmid Pull a VM template from the registry arguments: vmid VM to pull options: -t,--tag <val> Pull the particular tag (latest if not specfied) -l,--local Checkout (make it current) local tag --fetch-only Download tag without checkout -s,--shrink Delete other local tags to optimize disk usage --check-download-size Get the particular tag size (latest if not specfied) -q,--quiet Do not show progress -r,--registry <val> Sets an alternate registry
VM Templates
Once a VM has been tagged, it becomes a “VM Template”. The VM template+tag’s state cannot be permanently modified unless you create a new tag, post-changes. This is very reminiscent of how git commit works. You can execute comands and modify the state of the VM after tagging it, but it will not save the changes to the existing template+tag. This is important to consider when using the Anka Build Cloud Registry since it will only push the state of the VM when the tag was created, not after.
In summary, when cloning a tagged VM you have two options:
- Clone from the current VM state, regardless of the state when it was tagged (
anka clone {source} {clone}). - Clone the state of a VM template/tag by targetting the tag by name (
anka clone --tag {tagName} {source} {clone}), regardless of what has been done to it since tagging.
The clone is not automatically tagged.
❯ anka list | grep test
| test (v1)                                 | ff06aa5b-0825-4f86-b5d0-c1cdb39fcedf | Jan 25 13:15:10 2022 | stopped |

❯ anka clone --tag v1 test test3
8a4e0033-29b4-4c29-8a0c-51fa53093d1c

❯ anka list | grep test
| test3                                     | 8a4e0033-29b4-4c29-8a0c-51fa53093d1c | Feb 3 12:01:34 2022  | stopped |
| test (v1)                                 | ff06aa5b-0825-4f86-b5d0-c1cdb39fcedf | Jan 25 13:15:10 2022 | stopped |